| F4 Rallysport > Skye's Rally Journal > 2003
|
|---|
| Dec 23, 2003
|
Merry Xmas! Went on a much-needed vacation for a week around Thanksgiving,
and when I got back the
underside was painted,
also the
Cos T3 exhaust flanges
are ready to go and last but not least
Supra LSD adapters
for mating to either the stock XR halfshafts or the Cos 3dr shafts are
all flame-cut and ready for drilling. Got a big sheet of 4x8 lexan ready
to cut out the windows, deposit for front springs, and rear beam mods are
in the works at JVAB for fitting the Supra diff. The transmission is
almost done being "refreshed" and ready to be shipped back, we're going to
put in an output flange so the Cosworth driveshaft mates right up with no
modifications. Off for the Xmas holidays tomorrow, so no work until the
new year - then its full steam ahead!! If the rear beam mod is done by the
time I get back, then the car can be dropped on the ground for the last
time and final assembly can start. The flywheels are back from being
resurfaced, so all I need to get is the clutch and the engine and
transmission can be dropped in!
| | Nov 9, 2003
|
Minor detour lately working my street car. Hey, have to have one car
that works! Got the XR back in the rotisserie this weekend though, and
checked the engine to see if any rust was forming on the cam from sitting
outside in a crate. Looked OK so smeared it with oil and wrapped it in
plastic. Rebuilt transmission (3dr geared T5) should be back sometime
soon, and plastic window material will hopefully be sourced this week.
| | Sept 28, 2003
|
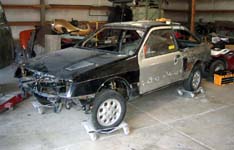
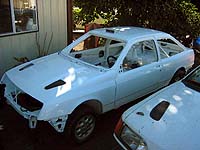 Took delivery of the car this weekend!! It looks quite fabulous in
"refrigerator white".
The bumpers and hood vents aren't painted yet though, they will be arriving
next weekend (in black), along with a bit of colour sanding and a bit of
touch up (the roof vent didn't get painted). I should put it back up in
the rotisserie and finish wire brushing off the undercoat and paint the
bottom with some POR-15 before we get too into putting it back together -
it's hard not to start bolting things on straight away though!! Oh yes,
and we still have to cut a few holes and install the quick-jack points.
Then the chassis will finally be done. Looks nice sitting next to the
white GrpA Sapphire Cosworth at any rate.
Took delivery of the car this weekend!! It looks quite fabulous in
"refrigerator white".
The bumpers and hood vents aren't painted yet though, they will be arriving
next weekend (in black), along with a bit of colour sanding and a bit of
touch up (the roof vent didn't get painted). I should put it back up in
the rotisserie and finish wire brushing off the undercoat and paint the
bottom with some POR-15 before we get too into putting it back together -
it's hard not to start bolting things on straight away though!! Oh yes,
and we still have to cut a few holes and install the quick-jack points.
Then the chassis will finally be done. Looks nice sitting next to the
white GrpA Sapphire Cosworth at any rate.
Here are a few more pictures from the
back,
engine bay
(ooh look at those engine mounts),
front,
top and
front quarter.
Now to just finish all the repairs on my new (used)
street car
so I can focus on the XR. Hey, I've gotta have one car that works...
Just realized this is the 1-year anniversary, to the day, since I bought the
car. Not quite my original 6 month estimate, but that's largely due to
other people's screwups, not mine. Everything would be much easier if you
didn't have to depend on anyone wouldn't it?
| | Sept 14, 2003
|
Went down to Puyallup today to see the work that's being (slowly) done, the
bodywork is about 80% done, so we put the front suspension back on the car
so it can be rolled around and aligned the doors. Will be finished,
painted, and delivered by the end of the month. At least, that's the plan,
I'll believe it when I see it. Since Summer is over and reassembly is
going to take place in the wonderful cold November rain again, I have dibs
on a metal framed temporary garage which should work quite a bit better
than the PVC pipe version I made last winter, which had a tendancy to fall
over in high winds. No new pics of the car because, well, other than a lot
of fiddly bodywork it still looks pretty much the same as it did in the
July 13 entry. Happy birthday to me...
| | Sept 12, 2003
|
Got this funny email the other day titled "SCCA Internal Guiding Priciples"
The tribal wisdom of the Dakota Indians, passed on from generation to
generation, says that "When you discover that you are riding a dead horse,
the best strategy is to dismount."
However, in modern business, education and government, and our beloved
SCCA, a whole range of far more advanced strategies are often employed,
such as:
1. Buying a stronger whip.
2. Changing riders.
3. Threatening the horse with termination.
4. Appointing a committee to study the horse.
5. Arranging to visit other countries to see how others ride dead horses.
6. Lowering the standards so that dead horses can be included.
7. Reclassifying the dead horse as "living impaired".
8. Hiring outside contractors to ride the dead horse.
9. Harnessing several dead horses together to increase the speed.
10. Providing additional funding and/or training to increase the dead
horse's performance.
11. Doing a productivity study to see if lighter riders would improve the
dead horse's performance.
12. Declaring that as the dead horse does not have to be fed, it is less
costly, carries lower overhead and therefore contributes substantially
more to the bottom line of the economy than do some other horses.
13. Rewriting the expected performance requirements for all horses.
14. Promoting the dead horse to a supervisory position.
Don't forget #15, "Try adding a 34mm restrictor to the horse's orifice"
| | Sept 10, 2003
|
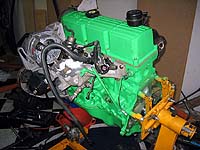 Engine is
back together
and ready to go. Well, except that might not be the
turbo
that ends up in the car from the get-go. Might do some work on the
accessories, doing a bit
of replumbing, while its still out of the car. It doesn't look that rusty
in person, must be the flash. Anyway, transmission is shipped off to to a
T5 specialist for a going over as well. Isn't that colour cooooool? Look
for the minty fresh engine at the next parc expose...
Engine is
back together
and ready to go. Well, except that might not be the
turbo
that ends up in the car from the get-go. Might do some work on the
accessories, doing a bit
of replumbing, while its still out of the car. It doesn't look that rusty
in person, must be the flash. Anyway, transmission is shipped off to to a
T5 specialist for a going over as well. Isn't that colour cooooool? Look
for the minty fresh engine at the next parc expose...
| | Aug 14, 2003
|
 Finished taking the engine part last night, the pistons, crank, bearings,
cam and valves all look great. I think I might have lucked out and picked
up a fairly low mileage engine; all that needs to be done is to
clean it
really well and put it back together with a fresh coat of paint. And of
course slap a flywheel on, as it used to be bolted to an automatic.
Finished taking the engine part last night, the pistons, crank, bearings,
cam and valves all look great. I think I might have lucked out and picked
up a fairly low mileage engine; all that needs to be done is to
clean it
really well and put it back together with a fresh coat of paint. And of
course slap a flywheel on, as it used to be bolted to an automatic.
I'm less than impressed with the progress on the paint and bodywork front,
the job was supposed to take 3 weeks and Joe at VIP Restorations has now
had the car for 3 months and has not been returning my calls. Time to drop
by unannounced and see what this joker does all day... it sure isn't
working on my car! Summer is running out!!
| | July 13, 2003
|
 Finally,
paint is being applied
to the car now. I cleaned (3rd time), then painted
sealer in the hard to reach
nooks and crannies with a brush, and Joe shot the engine bay, inner
fenders, and forward cabin with sealer on Sunday. Topcoat has to go on in
72 hours over the sealer, and he's going to finish up the bodywork and
paint the rest of the car over the next 2 weeks. Then I go back down and
lay out and paint the black stripes.
Finally,
paint is being applied
to the car now. I cleaned (3rd time), then painted
sealer in the hard to reach
nooks and crannies with a brush, and Joe shot the engine bay, inner
fenders, and forward cabin with sealer on Sunday. Topcoat has to go on in
72 hours over the sealer, and he's going to finish up the bodywork and
paint the rest of the car over the next 2 weeks. Then I go back down and
lay out and paint the black stripes.
More bad news in the world of North American rallying, last weekend
Mark Lovell and co-driver
Roger Freeman were fatally injured at the Oregon Trail ProRally. What
can you say, really. I've had a poster of Mark sliding his Subaru through
a corner in his 2001 championship year up at the office for a long time,
it gets me through the day when I think about what I have to look forward
to on the weekends. He was a real professional in a land of pretenders,
and he will be missed.
| | June 9, 2003
|
 Congratulations to
Markko Märtin
on winning his first WRC event at Acropolis this weekend, amazing drive
through adverse conditions. Memorable moments when the bonnet flipped up
into the windshield, blocking the view and fresh air vents, but with nearly
no visibility and climbing temps inside the car he drove on for 20km and
only lost 6 seconds! Well deserved for the young Estonian who led from the
start and has so much bad luck lately.
Congratulations to
Markko Märtin
on winning his first WRC event at Acropolis this weekend, amazing drive
through adverse conditions. Memorable moments when the bonnet flipped up
into the windshield, blocking the view and fresh air vents, but with nearly
no visibility and climbing temps inside the car he drove on for 20km and
only lost 6 seconds! Well deserved for the young Estonian who led from the
start and has so much bad luck lately.
In other news once again outsourcing work has proved to not go according to
plan, the bodywork and painting schedule has now slipped to maybe being
done the weekend of June 28th. Originally it was only supposed to take 2
weeks and now it looks more like 6 weeks. This puts the July TSD in BC
into serious jeopardy. I really wish I had the facilities to do all the
work myself because everyone else seems to be pretty bad at making
estimates as to how long things will take to get done, even though I am
never late paying for the work... certainly gives support to the argument
that you should just buy a car someone else has built and just go have fun.
I can't say I've had a whole lot of fun yet, but I still have hope.
| | June 3, 2003
|
 Sourced a turbo oil drain adapter from Turbonetics today (pn 20259) which
allows a 1/2" pipe fitting on the back of the T3, to match the same on the
block. When we put the engine back in we can now replace the turbo oil
feed and return lines with braided silicone or teflon hoses instead of the
weenie stock lines. If either of these lines broke on a stage (and they do
tend to break, even on street cars), the turbo would self-destruct pretty
quickly and maybe the rest of the engine too. Also found a used T5
bellhousing with hydraulic clutch components, which we might fit later to
replace the somewhat fiddly cable clutch mechanism that came on on stock
XR's and 3dr Cossies.
Sourced a turbo oil drain adapter from Turbonetics today (pn 20259) which
allows a 1/2" pipe fitting on the back of the T3, to match the same on the
block. When we put the engine back in we can now replace the turbo oil
feed and return lines with braided silicone or teflon hoses instead of the
weenie stock lines. If either of these lines broke on a stage (and they do
tend to break, even on street cars), the turbo would self-destruct pretty
quickly and maybe the rest of the engine too. Also found a used T5
bellhousing with hydraulic clutch components, which we might fit later to
replace the somewhat fiddly cable clutch mechanism that came on on stock
XR's and 3dr Cossies.
| | May 31, 2003
|
 In the run up to painting, I went down to Puyallup and wire brushed the
whole car and got to work cleaning with wax & grease remover to get the
chassis sparkling clean. The car looks great with the
3dr style rear window
but both of the
rear quarterpanels
have turned out to be seriously dented and bondo'd, which is in the
process of being fixed. Also the
sunroof patch
is getting final welding with as close of a "bow" as possible to the
rest of the roof. Joe's welding late into the night so it won't
be long now, should be finished painting everything on the weekend of
June 21th.
In the run up to painting, I went down to Puyallup and wire brushed the
whole car and got to work cleaning with wax & grease remover to get the
chassis sparkling clean. The car looks great with the
3dr style rear window
but both of the
rear quarterpanels
have turned out to be seriously dented and bondo'd, which is in the
process of being fixed. Also the
sunroof patch
is getting final welding with as close of a "bow" as possible to the
rest of the roof. Joe's welding late into the night so it won't
be long now, should be finished painting everything on the weekend of
June 21th.
I'm also working on tracking down some competition wheels, 15" for gravel
and 17" for street/tarmac. Hopefully some cheap, used, straight
Compomotive or Speedline rims. I will likely go with GrpA fitment which
means special "sleeved" studs. Any normal wheel can be converted to GrpA
style, you just have to drill out the normal tapered lug seat. Also, my
Bilstein "quick jacks" have arrived, originally they are for the VW Bug but
with a little modification and special holes in the sills will be used to
change a flat on the rally car in less than 120 seconds (with practice).
| | May 19, 2003
|
Joe has the hood louvres cut in and fake C pillar cut out and mocked up to
look like the 3dr Sierra Cosworth already (but not welded in).
| | May 18, 2003
|
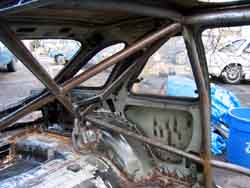
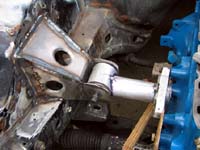 Spent the better part of the day
welding up the
GrpA engine mounts
which look wicked and are stronger than a brick sh*thouse. The arms are a
custom job for the stock 2.3t "Lima" engine. This setup is great, makes
replacing the engine or the steering/suspension a lot easier, its much
stronger, gets rid of the stupid "hydraulic" stock engine mounts and looks
like the business.
Close-up.
Spent the better part of the day
welding up the
GrpA engine mounts
which look wicked and are stronger than a brick sh*thouse. The arms are a
custom job for the stock 2.3t "Lima" engine. This setup is great, makes
replacing the engine or the steering/suspension a lot easier, its much
stronger, gets rid of the stupid "hydraulic" stock engine mounts and looks
like the business.
Close-up.
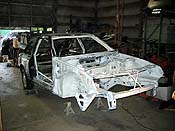
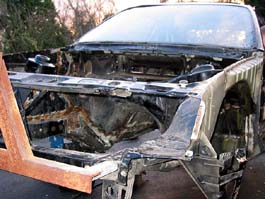
After filling in some holes in the floor with the welder and throwing in a
few more gussets off the roll cage, we loaded up the car and it was hauled
to Joe at VIP Auto Restorations in Puyallup, WA for final bodywork and
paint. Here are the "before" pictures,
from the front and
from the back
(sorry about the picture quality it was rather dark out by this time).
To say I'm excited & relieved to finally have it ready for paint would
be a major understatement. It has been a lot of blood, sweat & tears
but we have really prepared a world-class shell here, and the final result
is going to kick ass.
| | May 14, 2003
|
It was announced today that the SCCA is
cancelling all ClubRallies
that are not part of a ProRally until further notice. This must be the
result of the two spectators that were fatally hit at the Ski-Sawmill
ClubRally in Morris, Pennsylvania last weekend. Why the SCCA has chosen to
do this though is hard to understand. The accidents that have happened
(and will inevitably happen, it is a dangerous sport) have all happened in
ClubRally so I think the insurance companies might have pulled the plug on
the SCCA's ClubRally events, which makes sense if ClubRallies that are part
of a ProRally are run under separate (ProRally) insurance. However the
(unfortunatly the norm) complete lack of communication by the SCCA means
nobody knows for sure what is going on, least of all the club members.
The fact is that the competitors involved in the accident were former SCCA
champions and Seed 3, not beginners, makes you wonder why Club events are
cancelled and Pro events are not, especially since in almost all cases they
are run to the same standards and by the same people.
This is a terrible knee-jerk reaction and will hurt the sport quite a
lot in the USA especially at the grassroots level, unless the ban is lifted
very quickly. This might be the death knell for SCCA rally as several
organizers have already made comments about changing to another sanctioning
body. I think that might be a good thing, because from what I've seen the
SCCA doesn't make life very easy
for the "foundation" of the sport, the independant privateer. Also their
decision process is completely opaque and there is no accountability,
voting, recall, or checks and balances in their decision making or
oversight processes. In short, its a mess.
Anyway this pretty much throws my schedule out the window. We will likely
be only attending events in BC this year. Perhaps we can get some
rallysprints going at the ORV under some different insurance in the
meantime. Dryad/Shitepoke is in the can for sure, so I won't be doing
any volunteering either. More time to work on the car, I guess...
| | May 11, 2003
|
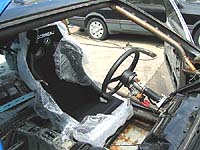 Test fit the seats in the car - they fit perfectly. When we drill out some
aluminum L-bar to convert them from bottom to side mount (much easier to
adjust that way), it should move it up 3-4cm and it will have the desired
line of sight out of the car. They are super comfortable too, and quite
wide but still snug. I think I can handle long drives in these without my
butt falling asleep. The OMP 6-bolt hub adapter for my used MOMO steering
wheel also arrived, so I bolted that on. I'm probably going to unbolt it
again though as I've decided to go with a Sparco external horn button, to
get it as close to my thumb as possible. The steering wheel has
under-thumb buttons already in it but my DMM shows the connection is
erratic at best when you press on them so they're pretty much useless.
Test fit the seats in the car - they fit perfectly. When we drill out some
aluminum L-bar to convert them from bottom to side mount (much easier to
adjust that way), it should move it up 3-4cm and it will have the desired
line of sight out of the car. They are super comfortable too, and quite
wide but still snug. I think I can handle long drives in these without my
butt falling asleep. The OMP 6-bolt hub adapter for my used MOMO steering
wheel also arrived, so I bolted that on. I'm probably going to unbolt it
again though as I've decided to go with a Sparco external horn button, to
get it as close to my thumb as possible. The steering wheel has
under-thumb buttons already in it but my DMM shows the connection is
erratic at best when you press on them so they're pretty much useless.
Also finished designing the new engine mounts and
fabricated the first pair
out of sheet metal. The new hole-puncher was put to use to open up a few
spaces for the wiring loom to pass though, paint to get in, moisture to get
out, etc. The lip is turned down so the strength is the same as without
the hole. Once they are welded in we can position an empty 2.3t block and
weld up some bar stock to our cut up standard engine mounts.
Just for kicks I also compiled a
table of rally car wheelbases
this morning. As you can see, not many cars less than about 245cm.
My XR clocks in at a nice steady 261cm so it should be quite stable,
which is a good thing considering the roads used around here are fast
and not very twisty.
| | May 05, 2003
|
Corbeau Forza seats, brake master cylinders, balance bar assembly, and
Momo steering 6-bolt hub adapter arrived today!
| | May 04, 2003
|
 Went down to Centralia today for the
PNWMON
Merkur club meeting, and picked up a
used bi-wing
for my car. That's about
it for today... weather is horrible. We're almost ready to weld in the
chassis engine mounts,
which will inch us ever closer to painting time. Need to weld in some
quick jacking holes too. That's about it.
Went down to Centralia today for the
PNWMON
Merkur club meeting, and picked up a
used bi-wing
for my car. That's about
it for today... weather is horrible. We're almost ready to weld in the
chassis engine mounts,
which will inch us ever closer to painting time. Need to weld in some
quick jacking holes too. That's about it.
| | May 01, 2003
|
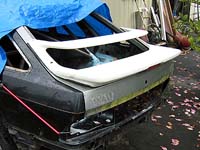
 Got another
XR hatch
that already has the glass broken out - no point in
destroying my good one, I could sell it for something. Took off the gas
struts and
put it on the car.
Eventually it will have a lexan window,
just like the side windows, which will weigh a heck of a lot less
(around 20 lbs?)
Got another
XR hatch
that already has the glass broken out - no point in
destroying my good one, I could sell it for something. Took off the gas
struts and
put it on the car.
Eventually it will have a lexan window,
just like the side windows, which will weigh a heck of a lot less
(around 20 lbs?)
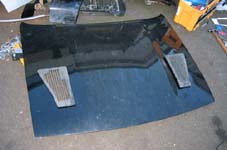
Yesterday I used my dremel to open up the hood louvres which I sourced for
$5 off a Datsun 280zx, cutting away all the plastic between the fins for
maximum airflow, especially on the turbo side of the engine. Tonight I
made up templates and
cut out holes
in the hood for them, the fit is quite
nice. The metal needs to be stepped down about 1cm for them to sit flush
with the hood though, hopefully Joe can take care of that. Could have
spent a couple hundred on a real 3dr Cossie hood, but why? I think it
looks great.
 We should be taking the car for paint this weekend finally, but the welding
rig is giving us problems and the van won't start... bad luck to say the
least!! At least the
M/C plate
got installed.
We should be taking the car for paint this weekend finally, but the welding
rig is giving us problems and the van won't start... bad luck to say the
least!! At least the
M/C plate
got installed.
I would also like to send my deepest condolences to the family and
friends of New Zealand's
Possum Bourne
who recently passed on due to massive injuries he received in an accident
while doing recce for a hillclimb in NZ. I never got a chance to meet him
but from everything I've heard he was a really outstanding guy and his
presence will be missed.
| | April 27, 2003
|
 Phew... sick (again), or maybe its allergies, but hauled ass anyway this
weekend. Weather was really beautiful, which was awfully nice (but makes
me want to be doing things other than working on the car, too). Didn't
quite make the goal of taking the car down to Joe for painting. But we're
really close now, I can count what's left to do on one hand, and most will
only take about 10 minutes or so each. First I "gently" removed the rear
side windows with a 2x4 and after cleaning up the glass, used a heat gun
and a gasket scraper to remove the rubber sealant and
get it nice and clean.
Joe is going to cut out this "fake C pillar", cut it in half lengthwise,
and then cut it into the void to make it look like the 3dr Cosworth Sierra.
I have no love for the 80's styling cues of the XR4Ti and while doing this
work isn't really necessary, it will make me feel a lot better in public.
Phew... sick (again), or maybe its allergies, but hauled ass anyway this
weekend. Weather was really beautiful, which was awfully nice (but makes
me want to be doing things other than working on the car, too). Didn't
quite make the goal of taking the car down to Joe for painting. But we're
really close now, I can count what's left to do on one hand, and most will
only take about 10 minutes or so each. First I "gently" removed the rear
side windows with a 2x4 and after cleaning up the glass, used a heat gun
and a gasket scraper to remove the rubber sealant and
get it nice and clean.
Joe is going to cut out this "fake C pillar", cut it in half lengthwise,
and then cut it into the void to make it look like the 3dr Cosworth Sierra.
I have no love for the 80's styling cues of the XR4Ti and while doing this
work isn't really necessary, it will make me feel a lot better in public.
We also welded in the gussets I made the previous weekend, at the
the top of the windsheild,
main hoop to B-pillar,
rear stays "X" and
where the forward hoop meets the front stays behind the dash.
We also cut out
the new holes for the dual brake master cylinders and
firewall reinforcement plate.
Since you don't use power brakes in a real rally car, we are installing
slightly different sized MC's for the front and rear brakes with a balance
bar between. May also install a bias adjuster in the cockpit. You want to
be able to really stomp on the pedals hard, so the plate is about 1/4"
thick on top of the already fairly sturdy stock firewall. It almost
looked like
John was having fun
doing this part! Until the air drill quit, at least.
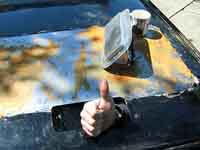
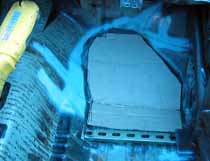
With a steady hand and careful measuring to avoid the cage diagonal, I used
my (wonderful) variable speed jigsaw to cut out the
roof vent hole.
You can see the sunroof patch in place too. Then I
riveted the vent in
and it looks and works absolutely great. The vent itself is aluminum and
cost about $30 from an RV supply store.
The large handle
makes it easy to open it either way and should keep us nice and cool.
Since the co-driver's seat is about 10cm further back than the driver's
seat, to move as much weight as possible over the rear driven wheels
(although it will restrict access behind the seat which is a bummer), I had
to cut out a new hole to weld in a nut and washer to use as the co-driver's
lap belt eye mount.
We finished up by starting to lay out the position of the engine mounts so
that we can put in the 2.3t Lima engine now, but have the option of simply
dropping in a
4wd Cosworth at some point.
Congrats to
Ramana Lagemann
for placing 10th in GrpN and 26th overall in his first WRC New Zealand.
Better luck next time Pat!
| | April 20, 2003
|
 Swaybar captive nuts were welded in more securely this week, before welding
in the footwell reinforcements with a nice crease to increase the strength
and some superstrut between the transmission tunnel and forward roll hoop
pedestal. Also, we got the sunroof patch panel tack welded in, the first
try wasn't a great fit but the second try was much better - thanks to Scott
for helping out with that one. On Sunday I fabricated a whole bunch of
gussets; two U-shaped gussets for attaching the main roll hoop to the
B-pillar, two half-tacos for covering the diagonal gusset bar at the upper
windshild corners, two "tacos" for covering the connection from the forward
roll hoop to the front stay bars, two "shovel" shaped bussets for attaching
the forward roll hoop to the A-pillar, and two more "tacos" to reinforce
the big X in the rear stays.
Swaybar captive nuts were welded in more securely this week, before welding
in the footwell reinforcements with a nice crease to increase the strength
and some superstrut between the transmission tunnel and forward roll hoop
pedestal. Also, we got the sunroof patch panel tack welded in, the first
try wasn't a great fit but the second try was much better - thanks to Scott
for helping out with that one. On Sunday I fabricated a whole bunch of
gussets; two U-shaped gussets for attaching the main roll hoop to the
B-pillar, two half-tacos for covering the diagonal gusset bar at the upper
windshild corners, two "tacos" for covering the connection from the forward
roll hoop to the front stay bars, two "shovel" shaped bussets for attaching
the forward roll hoop to the A-pillar, and two more "tacos" to reinforce
the big X in the rear stays.
My bodywork guru Joe Aros (who is restoring my
1966 MGB)
come down on Sunday and had a look at the XRatti, there are several dents
in the rear quarterpanels and a big smoosh behind the driver's side door
(for which we have a patch panel, luckily). He agreed to take on the job,
including pulling the little dents, fixing the driver's B-pillar, mudding
in the sunroof panel and deleting the fake C-pillar to make the rear
windows look like the 3dr Seirra Cosworth instead of the questionable
styling cues of the Merkur. Then the whole car gets painted white, with
black stripes just like the car
Didier Auriol
drove to win the Tour de Corse in 1988 (sorry Greg, first come first
served!). Some of the work is being done in exchange for my help doing the
mechanical teardown and buildup on another one of Joe's customer products,
an Austin-Healy Bugeye Sprite. Building a network of people that you can
help out and call on when you need help is essential. We will be towing
the shell to Joe's shop in Puyallup next weekend - a major milestone!!
Placed another major parts order last night, some of which is being air
mailed today so it can be welded on before the car goes out for
painting:
- LH drive Sierra Cos 3dr headlights (H1/H4 bulbs)
- mounting brackets for "
- Sierra Cos front grille
- pedal firewall reinforcement plate
- 2x master cyls (clutch, brake)
- balance bar for MCs
- Momo steering wheel hub adapter
- Brantz Laser 3 rally computer
- Brantz wheel probes (2x), probe switch, remote zero
| | April 10, 2003
|
 Quick recap of today's activities:
- Made templates, cut out and prepped for welding
footwell reinforcements
- Busted out the heat gun and Goodwill bread knife and cut out the
windscreen
and removed a couple of the rear side windows
- Designed, cut out and notched the
sunroof hole patch
out of a sheet of 20 ga sheet metal
- Colin's been busy at the back of the car prepping for paint, and
now that the
car is covered
again, the surface rust shouldn't come back.
- John's nearly finished the struts, only the lower "ears" to weld on now.
Then its time to source the 41mm Bilstein inserts!
That's it for this week, heading up to BC tomorrow for the WCRA TSD Novice
Rally #1.. and a little soaking at Harrison Hot Springs!
| | April 8, 2003
|
Got a week off work (nice suprise!!) so getting lots done on the car.
Since it was
raining
on Monday, I got to work inside and designed and
laid out
a whole bunch of
replica
engine mounts based on the
factory
GrpA Sapphire Cosworth engine mounts. This way, if I decied to get
a 2wd or awd
Cosworth engine, we can
drop it right in. It's also and advantage during servicing, the stock
configuration has the engine mounts on the steering/suspension crossmember;
with the engine mounts on the chassis rails, the crossmember can be removed
without disturbing the engine. While I did that, John laid out the
aluminum
transmission crossmembers
which should be welded up fairly soon as well.
On Tuesday, I cleaned up the sunroof hole and measured for the patch.
Fabricated a
maplight bracket to
be mounted on the cage above the co-driver's right shoulder.
Cut out
the old swiss-cheese rusted out battery tray area,
fabricated
a couple of patch panels, and
welded them in.
Designed, fabricated, and
welded
in the
seat rails
for mounting my future Corbeau Forsa race sets (got to try them out in Dave
Dunn's 510 on Sunday, great fit and look good too!) while
Colin
cleaned the car up and made a template for the floorpan reinforcement plates.
We put the big blue insta-garage back up just in time for the rain to start
again, its plenty rusty enough already and I'd like to keep the rain off
until the sunroof hole is filled at least. Colin and I put the doors back
on, and replaced the driver's side door (which had accident damage) with a
spare, after swapping over the handles, mirror, etc. Some more dents need
to be fixed, especially on the drivers side. I don't care too much about
having perfectly pristine bodywork, but its smooshed in pretty bad behind
the door and should be fixed to some degree. My friend Joe who is doing
all the bodywork on my "daily driver"
1966 MGB
might fix up those areas (if I can find the patch panels) in exchange for
a little mechanical work on another customer's Bugeye Sprite. The barter
system is great, and having a network of skilled friends really makes
everything go much smoother (and much easier on the chequebook)
| | March 30, 2003
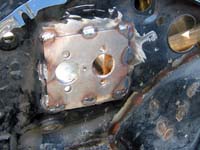
|
 The cage is done!! The
rear stays go to the strut
tops, just like in
GrpA Escort Cosworths
circa 1993 (diagonals to rear beam still to do). We even
double skinned
the strut tops, just to be safe. The strut towers, although relatively
thin metal, will transmit forces along its length, and is very strong in
that orientation. Small horizontal bars are the mounting point for the
shoulder belts. Plenty of room inbetween for a fuel cell and spare tires.
The front of the cage was completed as well, with two tubes going to the
front strut towers.
The cage is done!! The
rear stays go to the strut
tops, just like in
GrpA Escort Cosworths
circa 1993 (diagonals to rear beam still to do). We even
double skinned
the strut tops, just to be safe. The strut towers, although relatively
thin metal, will transmit forces along its length, and is very strong in
that orientation. Small horizontal bars are the mounting point for the
shoulder belts. Plenty of room inbetween for a fuel cell and spare tires.
The front of the cage was completed as well, with two tubes going to the
front strut towers.
| | March 23, 2003
|
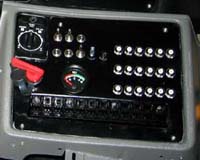 Still feeling the lingering effects of that flu, but I finished
cutting out
the holes in the control panels at home (taking over the dinner table in
the process, to the delight of my girlfriend) and
painting
them semi-flat black (yay for fast-dry Krylon!). Then I
assembled
all the switches and knobs, and lo and behold my measurements were OK and it
all fit with a tiny bit
of room to spare for future expansion. If I had to do it again, I would
definately cut out the stock heater switch and just use a low/off/high 3
position switch, just for the extra room, or maybe do away with the plastic
lower console shroud altogether like in
this Escort.
Back at the Asylum, Colin and John finished off the rear strut tower
reinforcement and got most of the suspension back on, so it should be towed
back up to North Bend today or tomorrow. I also received my VDO M10X1 oil
temperature and pressure senders today, which only leaves the fuel pressure
sender, which is going to be tricky to find and fit. Fabrication of the
navigator control panel will need to be done too, as well as cutting some
holes in the beautiful dash to clear the roll cage tubes.
Still feeling the lingering effects of that flu, but I finished
cutting out
the holes in the control panels at home (taking over the dinner table in
the process, to the delight of my girlfriend) and
painting
them semi-flat black (yay for fast-dry Krylon!). Then I
assembled
all the switches and knobs, and lo and behold my measurements were OK and it
all fit with a tiny bit
of room to spare for future expansion. If I had to do it again, I would
definately cut out the stock heater switch and just use a low/off/high 3
position switch, just for the extra room, or maybe do away with the plastic
lower console shroud altogether like in
this Escort.
Back at the Asylum, Colin and John finished off the rear strut tower
reinforcement and got most of the suspension back on, so it should be towed
back up to North Bend today or tomorrow. I also received my VDO M10X1 oil
temperature and pressure senders today, which only leaves the fuel pressure
sender, which is going to be tricky to find and fit. Fabrication of the
navigator control panel will need to be done too, as well as cutting some
holes in the beautiful dash to clear the roll cage tubes.
| | March 20, 2003
|
Not much happening this week. The suspension needs to go back on the car
so it can be towed back to Cascade for additional work on the roll cage,
but I'm still quite sick so that might not happen this weekend.
Unfortunately this means the schedule is slipping by at least 2 weeks. I
did receive some used and very cheap step drill bits (Unibits) from eBay
today though, so at least I can start drilling out all the holes in my
custom control panels at home, between tea and vitamin C breaks. In other
news the war on Iraq started today, which is pretty depressing.
| | March 16, 2003
|
 Had a touch of the flu on Saturday, but got some progress in and even had a
bit of sunshine on Sunday. Seam welding is complete on the whole car now!
I got to work and drilled out all 51 welds holding the LH fender on (I
counted them this time), while John hit a few seams we missed in the
interior and touched up the sill reinforcements. Then I busted out the
Sawzall and "gently" removed the stock headlight brackets. Future F4
Rallysport co-driver superstar "Haulin" Colin Street stopped by, and wasted
no time in picking up some tools and
pitching in
(gooood sign) and listening patiently while we bitched about the challenges
facing the poor unworthy Clubman and explained Hitchhiker's Guide
references.
Had a touch of the flu on Saturday, but got some progress in and even had a
bit of sunshine on Sunday. Seam welding is complete on the whole car now!
I got to work and drilled out all 51 welds holding the LH fender on (I
counted them this time), while John hit a few seams we missed in the
interior and touched up the sill reinforcements. Then I busted out the
Sawzall and "gently" removed the stock headlight brackets. Future F4
Rallysport co-driver superstar "Haulin" Colin Street stopped by, and wasted
no time in picking up some tools and
pitching in
(gooood sign) and listening patiently while we bitched about the challenges
facing the poor unworthy Clubman and explained Hitchhiker's Guide
references.
The great thing about the headlights is that the slam panel stamping is
identical to the Cossie 3dr Sierra in the UK, with the exception of a pair
of reinforcements which are easy to get and cheap, so the very bright and
very nice
Cosworth 3dr headlights
line right up with already formed mount holes and adjustment access holes!
The stock lights are truly awful, and get all yellowish, inadequate for
decent street driving not to mention any nighttime rally action.
The car goes in for some major roll cage modifications on Monday or
Tuesday, including running the stays to the front strut towers, and we need
to mock up the proper motor mounts soon. The suspension parts are coming
along nicely as well, the
strut tubes
have been threaded and the brass bushings are pressed in. A Cosworth spec
T5 transmission with close ratio gearset is also on order from the UK via
JVAB Imports. Gear ratios are extremely important in rally, in Sweden
the mantra is "70kph in 1st" which gives you an idea how tall 1st can be.
| | March 10, 2003
|
Another big push this weekend,
seam welding
is done under the car, and the interior is 95% seam welded. RH front fender
is off, after drilling out the million spot welds holding it on (LH still to do
but now we can't find the spot weld drill bit grrrr!). Exhausted, but getting
very close to starting reassembly. Unfortunately some hold ups mean painting
can be done at the earliest the weekend of March 22. Looks like I might be
able to get a good deal on another 2.3 turbo engine with T5 transmission from a
known-good car (which was in an accident), so we might be yanking that next
weekend. Always nice to have a spare engine around, mentally you might be a
little more inclinded to flog it when needed. Would be great to have a spare
shell too, but that's not going to happen in the short term.
In suspension news, the strut tubes have been milled and threaded, now the
bronze bushings are being pressed in. This is the part of the construction
of the car where the big bills start rolling in (cage weld, seam weld,
suspension parts...) but I'm managing to stay close to budget.
| | March 2, 2003
|
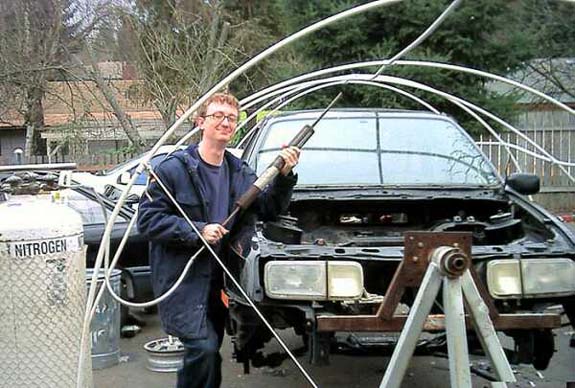
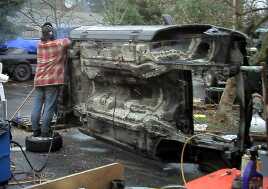 Seam welding well under way now, took advantage of the nice weather on
Saturday to get a LOT done. Dropped the
front and rear suspenion
and put it up in the stands. Note I've got the ZF steering rack (identifiable
by the half-waffle pattern) which has a much faster steering ratio (around 2.6
turns lock-to-lock) than the earlier TRW rack (about 4.1). Still nowhere near
GrpA ratios (1.9), but should be good enough for now.
Seam welding well under way now, took advantage of the nice weather on
Saturday to get a LOT done. Dropped the
front and rear suspenion
and put it up in the stands. Note I've got the ZF steering rack (identifiable
by the half-waffle pattern) which has a much faster steering ratio (around 2.6
turns lock-to-lock) than the earlier TRW rack (about 4.1). Still nowhere near
GrpA ratios (1.9), but should be good enough for now.
Everything goes so much faster with two people working simultaneously! My job
was working the liquid nitrogen, freezing and chipping off the rubberized
undercoating while John would seam weld behind me. Hard work, but very much
worth it, seam welding stiffens the shell an incredible amount. Ford
Motorsport wouldn't list it as the very first thing to do, in bold underline,
in "Preparing the Sierra for Motorsport" if it wasn't important. Not only will
it make the handling more predictable, but it's safer in case of accident and
generally results in less damage to the shell in minor off-road excursions.
After a while we switched off and I drilled out the profusion of spot welds
holding the RH fender on. The fenders will be pulled off for better access for
seam welding, and also to convert them to bolt-on so they will be much easier
to change if (when) they kiss a tree, rock, etc.
Unfortunately the weather on Sunday didn't cooperate, we perservered anyway
and ended up a little over 1/2 finished seam welding the bottom of the car.
The pseudo-GrpA suspension pieces are coming along nicely too, we stopped by
the machinist's and watched him turn down some of our WAY cool and strong
strut tubes with threaded bodies from 4130 CrMo DOM stock. Lower spring
perches will also be done soon, so everything's coming along quite nicely!
Would have loved to have made it to DooWops this weekend though. Did spend a
little time hanging out with fellow CCCP'ers Scott (Spokane) and Neal after the
work was done, you can't forget to put down the tools and enjoy a little
comraderie! Rally is about having fun after all...
| | Feb 17, 2003
|
 Got back to work on the car finally, saw the
first revision of the roll cage
and the welding is beautiful, just need a few minor tweaks to finish it
off. Since it was cold and rainy all I got done was stripping out the
remainder of the sunroof assembly (drilling out spot welds is always fun).
I've picked up nearly all the wiring supplies I need to satisfy my massive
rewiring plans, and the dash is nearly ready to be fitted. The most
important task of all, picking out a beeechin' steering wheel, has also
been taken care of! Actually it will probably be one of the last things
fitted to the car. The next major task is seam welding the car.
Got back to work on the car finally, saw the
first revision of the roll cage
and the welding is beautiful, just need a few minor tweaks to finish it
off. Since it was cold and rainy all I got done was stripping out the
remainder of the sunroof assembly (drilling out spot welds is always fun).
I've picked up nearly all the wiring supplies I need to satisfy my massive
rewiring plans, and the dash is nearly ready to be fitted. The most
important task of all, picking out a beeechin' steering wheel, has also
been taken care of! Actually it will probably be one of the last things
fitted to the car. The next major task is seam welding the car.
| | Feb 1, 2003
|
Roll cage is welded in, car is ready for pickup. Now I have to haul the car
back to the shop, strip off the remainder of the suspension, brake lines, etc
and prep it for stitch welding. The dash is coming along nicely, although
I'm stuck at the moment waiting for an XR Wiring Manual to arrive in the
mail. I have been keeping busy selling all the parts I won't be using on eBay,
to put back into the budget. I picked up some nice Hella twin air horns, and
have some VDO gauges on the way. I've also got a nice Avanti navigator's
light, and an adjustable cockpit light for the interior light, both off eBay.
My shipment of nine
half-used gravel tires
arrived recently from Michigan, these will be my "test tires" for getting the
car set up and developing my sideways driving ability. I figure you can buy a
lot of tires for the cost of one of the rally driving schools, and there's no
replacement for seat time. After shipping, it worked out to $39 each. The
Michelins (7x FB-71 and 2x FB-87) will be mounted on inexpensive but effective
Saab rims, no point giving big $$ to Compomotive right now. Snow and ice
tires are still TBD.
I also
covered my dash with felt
at a cost of less than $10, important to keep glare down. Did a very
good job I think, looks professional. Removed all vents etc from the dash
before laying on the felt with contact cement, then trimmed and re-fitted
all the components. Fabrications of custom control & gauge panels
to be completed a little later.
| | Jan 1, 2003
|
Happy New Year! Today the bumpers came off and the XR went up in the
stands ready for the liquid nitrogen treatment to clean off the seam sealer and
undercoating for cage and seam welding. Might go back this weekend and
pull off a few more parts, the gas tank and side cladding is still on the
car. In the mean time, I hauled the dashboard back and have it sitting in
the living room (much to my girlfriend's delight), where I can glue on some
anti-glare material and start designing the control
panels. I'll be modelling my controls after a rally prepared Sierra
Sapphire Cosworth at JVAB's, and picking up the switches down the road at
Radar. T-bird target will be a bit of a stretch but its still possible.
|
Continue reading:
2006 |
2004 |
2003 |
2002
|
|


