| F4 Rallysport > Skye's Rally Journal > 2004
|
|---|
| September 26, 2004
| |
Quite a productive weekend, even though I was a bit hung over on Sunday!
First, I cut and ground away notches for the sleeves for the transmission
mount, then John welded on the sleeves. Drilled a few more holes in the 1"
aluminum plate that offsets the cossie T5 mount forward a few inches, and
bolted the assembly to the
transmission. It worked out rather well, and provides enough clearance
to the speedo drive too. After than it was simply a matter of offering up
the anodized crossmember and
drilling a couple of holes for the through bolts. Transmission mounting
done!
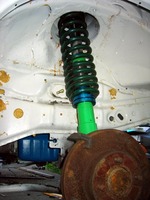
John had finished milling the bushes for the GpA tops on the dampers, so
I went ahead and installed the
front suspension which looks quite lovely. The springs are even offset
to clear the wheels. Unfortunately my 17/65 tires on ET40 rims have
serious clearance issues. 15/65 tires on ET33 rims (Saab specials) clear
fine, so it looks like I might want to run smaller tires on the front. The
15/65 sure are a hell of a lot lighter, but that complicates the spare tire
situation a little. I'll still need some wheel spacers and longer studs
too, but might as well wait until the cossie 2wd knuckles arrive on the
boat. Anyway, the Ford factory team used smaller wheels up front, so it's
something to consider. No idea what the rears are going to be like.
With the transmission firmly secured, I did the final markings for the
engine mount through bolts, and slotted out the holes with the air-powered
die grinder (oh what fun). Then, with the jack supporting the engine, John
welded fat washers onto both sides of the chassis rail mounts. After the
car's on the ground, we'll pull the "mockup" block and transmission, finish
welding all the way around the washers, clean and paint, and install my
rebuilt engine. Here's a view from under the car of
the complete drivetrain
mounting system - Built JVAB Tough (tm).
| | September 22, 2004
| |
Last weekend I jacked up the bare block and bolted on the engine mounts
and lowered it back in; the mount holes on the chassis rail mounts need to
be ovaled out a bit, and then weld a washer on. All the measuring and
planning worked out quite well though, the back of the transmission is only
about 1cm from center. A long screwdriver and a bit of prying on the edges
of the mounts will fix that. I designed the adapter plate for the
transmission mount as well, built it out of a 1" thick piece of aluminum
which bolts at a 90° angle to two 6" pieces of 1.25" square stock
welded together. John's sawing and welding the sleeves for the rubber
mounts onto the square stock at the machinist's today, then the whole
assemble slides into the transmission crossmember we already fabricated.
Once the transmission's in place I'll make the final markings for the
engine and that's all done, ready for the whole drivetrain to be put in.
The air freight arrived with the remaining suspension goodies last
night, so I went out and started final assembly on that. Looks like the
spherical bearings for the top mounts took up a bit of the slop we were
worried about when they were pressed into the tops, and after packing with
grease they seem ok. So today John's also turning the top bushing to fit
over the GpA top mounts on the dampers. I picked out a couple of nice
springs from the collection, and everything will be ready to bolt up on the
front suspension shortly!
The rear suspension is a bit more problematic. The dampers we have
don't fit the stock XR trailing arm. John has found me some GpA reinforced
trailing arms, rose-jointed and everything for adjustable toe, but they're
over in the UK. Need to figure out air costs on that. The 2wd cos front
knuckles are on the way already though, via slow boat. They may or may not
arrive before I leave for NZ on Oct 27. Which means the brakes might not
get done before then. The other big tasks remaining are wiring, which I
already did a bunch of work on waaaay back, converting to hydraulic clutch,
and plumbing the engine cooling and lubrication. And, of course, working
out all the gremlins, leaks, etc that will inevitably spring up once the
car's running.
But, if I can get it on the ground, and maybe get the engine fired up
before I leave, that will be a major accomplishment. It's just so annoying
that I'm not going to get to drive it for a whole year and a half now that
it's almost done! Perhaps I can find a rally school in New Zealand that
will give me seat time in exchange for working odd jobs. I have to say my
fabrication skills have become pretty good over these last 2 years!
| | September 6, 2004
| |
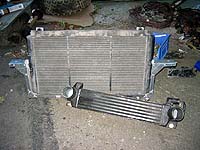 Finished building the custom aluminum padded mount for the
Saab 900 radiator
and Sierra Cosworth intercooler which has nice metal end tanks so
hopefully it won't
crack
like the stock
Cossie 3dr radiator.
The mount brackets at the top of the Saab radiator had to be fabricated and
welded on at the extremes of the radiator width to bolt up to the
bottom of the intercooler, another advantage of a metal radiator.
Finished building the custom aluminum padded mount for the
Saab 900 radiator
and Sierra Cosworth intercooler which has nice metal end tanks so
hopefully it won't
crack
like the stock
Cossie 3dr radiator.
The mount brackets at the top of the Saab radiator had to be fabricated and
welded on at the extremes of the radiator width to bolt up to the
bottom of the intercooler, another advantage of a metal radiator.
Too bad the Cossie radiator has the dumb plastic end tanks with the mounts
built in
like the stock XR radiator,
so if you have the slightest knock it cracks the tanks and you lose all
your fluid. If you look at the "crack" picture above that's exactly what
happened. The Saab radiator is a bit smaller than the Sierra Cosworth
radiator, but it's got much higher
fin density
than the stock XR radiator, which should be plenty for our needs. Plus,
the Saab's twin fans (tested) push a hell of a lot of air. The fans will
run normally off the thermoswitch under normal conditions, but there will
also be a switch which hard-wires the fans on all the time during special
stages, so a sensor failure can't cause overheating.
Engine mounts are
done! Now I can pull out the
bare "mockup" block
and put in the engine and weld up the T5 transmission crossmember adapter.
The T5's gearshift is quite a bit more forward than the stock Type9, so
some cutting and a shift lever with a kick in it (Mustang, etc) will need
to be sourced.
| | June 26, 2004
| |
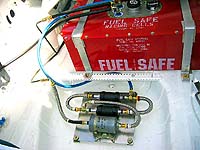 Finished removable dual
fuel pumps (Walbro) and filter (Bosch) in spare tire well, and made all
the hoses between the pumps, filter and fuel cell feed, return and vent
lines. Dual redundant pumps, just like GrpA factory cars.
Finished removable dual
fuel pumps (Walbro) and filter (Bosch) in spare tire well, and made all
the hoses between the pumps, filter and fuel cell feed, return and vent
lines. Dual redundant pumps, just like GrpA factory cars.
Sourced M12 and M14 to AN-6 unions, so I can use cheapo VW/Audi OEM Bosch
fuel filters. Cheap = more likely to replace more often. Same filter used
in Audi 5000 Turbo, so should flow plenty. $12 vs $80+ for "race filters".
Made a cover for the fuel pumps
to isolate the fuel system and provide a mounting area for the spare wheel.
Of course the wheel still needs to be tied down with some belt. Mmm, those
rally Compomotives sure make me tingly all over.
Prototyped the hydraulic
handbrake although the lever ratio will probably need adjusting, so the
mount for the clevis is just lightly tacked on. All brake plumbing is now
done, except for hoses from MC fluid resevoirs.
| | June 13, 2004
| |
 Been doing lots of work on the car, just haven't had time to update the
website. So many things done, can't remember half of them. Last weekend
I made some tie-down straps for the fuel cell and started wiring up
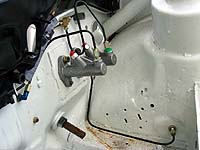
the Saab in-tank pump. Today I ran the
front and
rear brake lines,
I think I did a rather nice job. AN-3 and hard lines everywhere, 90 deg
steel bulkhead fittings in the wheel arches for maximum protection from
rocks. Fitted the modified (longer) clevises for the balance bar assembly,
I think it's going to have enough pedal travel; if not, we can always weld
a nut on the end of the clevis to extend it a little further. Painted the
throttle pedal Dove Grey like all the others, and bolted the OMP pedals
on to see how it would all fit. We've got most of the caliper, rotor and
hat decisions made, so it will be time to cough up some dough for that
soon. Next up is the hydraulic handbrake and running a couple of long
lines down the top of the tunnel and all the brake hard lines will be done!
Need a few more fittings for the fuel lines, can make up the hoses for
those shortly.
Been doing lots of work on the car, just haven't had time to update the
website. So many things done, can't remember half of them. Last weekend
I made some tie-down straps for the fuel cell and started wiring up
the Saab in-tank pump. Today I ran the
front and
rear brake lines,
I think I did a rather nice job. AN-3 and hard lines everywhere, 90 deg
steel bulkhead fittings in the wheel arches for maximum protection from
rocks. Fitted the modified (longer) clevises for the balance bar assembly,
I think it's going to have enough pedal travel; if not, we can always weld
a nut on the end of the clevis to extend it a little further. Painted the
throttle pedal Dove Grey like all the others, and bolted the OMP pedals
on to see how it would all fit. We've got most of the caliper, rotor and
hat decisions made, so it will be time to cough up some dough for that
soon. Next up is the hydraulic handbrake and running a couple of long
lines down the top of the tunnel and all the brake hard lines will be done!
Need a few more fittings for the fuel lines, can make up the hoses for
those shortly.
Threw in a spare 3dr headlight and my grille
just to see how it looks
(answer: pretty damn fine) - oh yeah and to see where we can put the
monster oil cooler as well. Remote oil filter heads have also arrived...
| | May 16, 2004
| |
Was feeling kind of lazy this weekend (guess I'm allowed) so just
puttered around a bit and didn't get too much done. Worked on the fuel
lines a bit, terminating them at the old fuse box hole. Cut and flared the
ends of the fuel lines, and installed swivel fittings. Cut out the old
slam panel X-brace for the cossie grille. Repainted a couple of rusty
spots.
Put my helmet on and threw the Corbeau seat in with the seat rails to
check clearance. Pretty tight... going to have to bolt the side-mount
adapters directly to the adjuster rails with no side plate, and pad the
side roof bar where i hit my helmet all the time. Steering and pedal
distances seem pretty good.
Made a nice electrical test rig with a 10A resettable breaker for
checking my custom wiring loom. Messed around with the fuel pumps, mocking
up where to put things and the outlet fittings options. Did some research
on cheaper replacements for the XR4Ti fuel pump, as it costs about $250 and
mine's toast, so I need two.
| | May 9, 2004
| |
 Things are progressing at a rapid and steady rate now. Fabricated the
seat rails
and the rails for converting my Corbeau Forza's from bottom to side mount,
just the slotted side adjustment plates left to do on those. Need to do a
test fit with my helmet to verify roof clearance won't be a problem. Only
had to drill (4 * (16 + 2 + 4)) = 88 holes! Thank goodness for the drill
press.
Things are progressing at a rapid and steady rate now. Fabricated the
seat rails
and the rails for converting my Corbeau Forza's from bottom to side mount,
just the slotted side adjustment plates left to do on those. Need to do a
test fit with my helmet to verify roof clearance won't be a problem. Only
had to drill (4 * (16 + 2 + 4)) = 88 holes! Thank goodness for the drill
press.
Worked some more on the wiring loom to the back of the car, cut up the
corrugated loom tubing and T fittings and fed it through the panels to see
how it would all line up - very nice. Then I got to work
bending the fuel lines
which are 3/8" steel brake line, so are rated for a zillion psi. The order
for the remaning fittings, flexible hose and bulkhead fittings is in
progress, so that can be finished off and we can start constructing the
pump and filter assemblies.
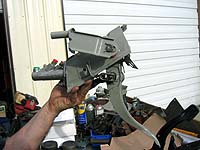
Nearly done fabricating the
dual master
pedal assemblies, JVAB fabricated some
aluminum bushes
for locating the pedals securely with no slop at all. However after I
test fit the assembly
it was clear the brake pedal was sitting much to low at rest. Some quick
comparison to John's Sierra and the GrpA Sapphire showed the master rod
length and bush location in the pedal arm were the same, and so logically
we compared the clevis length, sure enough it was nearly 1cm shorter which
explained the pedal height difference. We're simply going to machine some
spare clevises to mate with our hefty balance bars and all should be well.
As if that weren't enough, we also worked on fabricating a mount to
relocate the alternator from above the PS pump on the right-hand side
to the bottom of the engine on the left, which as John says, will eliminate
approximately 2,000 miles of intercooler tubing, which is always a good
thing. We're also giving some thought to what's available in hats, rotors
and calipers for starting on the brakes soon. And bugging the rear beam
fab boys to get a move on.

Big congratulations as well to BC's very own Patrick Richard who has as
of this weekend, won 4 out of 4 of this year's
SCCA ProRally
Championship in a Group N car no less! Pat's the best rally
driver to come out of North America in quite some time (perhaps of all
time), and since the European "hired guns" aren't driving this year due to
the manufacturers all pulling out of the series, his star is shining
bright. The Rim of the World rally requires a calculated drive as not to
break the car, and he judged it just right. Hopefully he will find enough
sponsorship money to change his plan (to win Group N) and contest all the
ProRally events this year - no doubt he has an excellent chance at the
overall driver's championship this year with these great results. Go Pat!!
His driving career has been a big inspiration for me, I hope to be at
his level someday...
| | May 2, 2004
| |
 Drew up a
false floor template
for the driver's side today, which will be covered with grip tape, and
covers the cage foot plate and reinforcement strut. After the false floor
is riveted into place, the dead pedal will be mounted to the far left.
Here's a tip, kids: make sure to use aluminium that you can actually BEND.
Drew up a
false floor template
for the driver's side today, which will be covered with grip tape, and
covers the cage foot plate and reinforcement strut. After the false floor
is riveted into place, the dead pedal will be mounted to the far left.
Here's a tip, kids: make sure to use aluminium that you can actually BEND.
Then we started on test fitting the dual brake master cylinders.
After honing out the pedal sleeve (warped slightly during welding),
we tested the fit of the
balance bar
and realized I had to slot the road locating brackets another few mm,
as well as measure the gaps for fabricating aluminum pivot spacers.
Note the brain juice on top of the false floor material, required for
this level of fabrication. With the dual masters (0.700 front, 0.750 rear
just like the factory) and the balance bar, a high degree of adjustability
is available. Check out the
Wilwood Brakes
catalogue under "Pedal Assemblies" for balance bar settings information.
Here you can see the effect of moving the balance bar spherical bearing
under pedal load from
full left to
full right.
Notice the change in balance (hence the name) of force applied to the
front vs rear MCs. John will get the balance rod turned down and
threaded right up to the circlips by the spherical bearing in the next
few days, so I will have the maximum adjustment range. We also need to
weld on a nut for a simple pedal stop. I think the
final product is quite
impressive! Now to muck around with the clutch (converting to hydraulic
instead of the stock XR4Ti cable clutch) and the go-fast pedal.
Finally, did a bit more work on cutting up the rear wiring loom and
started feeding it into my Waytek split corrugated loom tubing. The
installation is going to be beeeyoootiful, and easy to maintain and modify
in the future.
| | May 1, 2004
| |
 Finished building the
pedal boxes
and welded on the centering tabs for the dual master rod supports. Chopped
out a section from the brake pedal and welded in the tube for the balance
bar's spherical bearing, and a small tab for the return spring. Cut up a
couple of backing plates for running the bolts bolts through the stock
pedals and mounting my nice OMP pedals. Finally, primed and painted all
the pedal bits to prevent rust. Of course a little brake fluid spill and
it will all be a mess, but at least it will be nice when I install it!
Finished building the
pedal boxes
and welded on the centering tabs for the dual master rod supports. Chopped
out a section from the brake pedal and welded in the tube for the balance
bar's spherical bearing, and a small tab for the return spring. Cut up a
couple of backing plates for running the bolts bolts through the stock
pedals and mounting my nice OMP pedals. Finally, primed and painted all
the pedal bits to prevent rust. Of course a little brake fluid spill and
it will all be a mess, but at least it will be nice when I install it!
Super-glued the cracks in the bi-wing I got a while back, and installed
that. Cleaned the overspray off the side mirrors and windshield and
touched up a few spots on the cage where we gouged the paint during the
dash modifications,
dark grey in the line of sight.
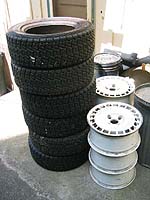
Also hauled all the
rims and tires
to my house, to take in to get
mounted up next week. No point in balancing them of course, considering
the speed and frequency of bashing into holes and rocks out on the
stages. Also stopping by the JVAB garage today were
Scott and
Kevin working on their
respective cars. The weather is wonderful, and I have an inspirational
work environment!
| | Apr 29, 2004
| |
 Back from a short holiday, time to really knuckle down and get the car
finished by the target date of June 1st in time for Dryad/Shitepoke.
Working on it on weekends, after work when I can, all the time I can spare.
Back from a short holiday, time to really knuckle down and get the car
finished by the target date of June 1st in time for Dryad/Shitepoke.
Working on it on weekends, after work when I can, all the time I can spare.
Installed the interior door panels and cut away a bit to clear the door
bars. Finished sealing the roof vent and cleaned all the overspray off the
Lexan windows (Autosol metal polish works well without damaging the
plastic) to make the car a little prettier. Layed out the
stock wiring loom
and started
chopping it up.
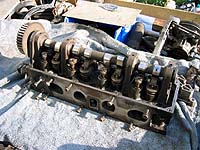
Cleaned up the replacement
2.3L turbo head
(after dropping the engine off the stand and nearly crushing my leg
last month), ready to install.
Last night we cut up and bent the metal for fabricating the GrpA pedal
boxes, using John's original 909x Ford Motosports part as our guide. Laid
out some duckets on 6x used Compomotive TH 15x7 wheels. Rear beam fab
seems to be stalled, hope that starts progressing again soon.
If I keep chipping away at the task list, it should all get done in
time. Gotta stay focused, we're on the home stretch!!
| | Mar 1, 2004
| |
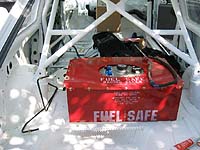
Fuel cell ordered! "Fuel Safe", FIA Approved, 15 gallons, with a sender
for the Ford gauge, lots of 3/8" fuel line is waiting, and also lots of
3/16th for brakes. 2 1/2" screw filler, 3/8" pick up, vent, and return.
Steel cans.
| | Feb 29, 2004
| |
 Another productive weekend!
Flipped the car on the side and drilled out
the many, many spot welds on the rear spring seats, which won't be needed,
then the remaining bits and pieces left from when I removed (via sawzall)
the old headlight mounts. I fabricated a couple of plates to close
up and reinforce the bottom of the
engine mounts
a little more, then John
welded them in and welded in the
Cossie 3dr headlight
mounts. Now the strike plate is very solid, and I can chop out the
US spec X brace for the Cossie grille.
One of the main goals of the weekend was gluing the
windshield in finally!!
To finish the weatherproofing, I ran a bead of silicone caulk all around
all the Lexan windows, the roof vent and the patch panel I made for the
battery tray area. Finally we cleaned up all the new welds and slapped on
another coat of white paint. White is a great colour for a rally car,
since you're welding and fixing panels pretty often, and its very easy to
retouch and repaint without the hassle of colour matching.
As if that wasn't enough, then we pulled out an old nasty XR dash
John had stashed away and cut it up as a
sample dash
for fitting my nice felt covered console around the cage. Here's probably
the last picture of the
stripped interior showing
the whole cage, as we add more and more creature comforts.
I guess we'll see if there are any leaks now, the next time it rains.
I'm sure I won't have to wait too long. The days are getting longer which
will speed up the work considerably! I'm getting really psyched now.
| | Feb 22, 2004
| |
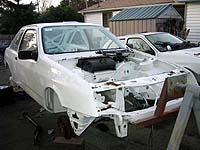
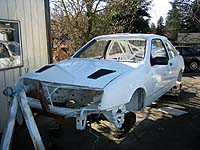 Last coat of paint is on now, its shiny all over and looks really nice
(check it out
from the back,
looks pretty nice with the bi-wing and lights eh?) Before the windsheild
goes in I masked and
bombed the A-pillars
a nice dark grey so the line of sight doesn't have anything distracting
(especially for night events). Also glued in the hood louvres with some
silicone, we'll see how well that adheres. I also put the windshield wiper
motor and linkage back in place, easy things that makes you feel like
you're making progress. We were going to install the windshield too, but
the glue goop doesn't have a long shelf life I guess, because it refused to
come out of the tube. Maybe for the best since we didn't have the right
applicator anyway, it's awful stuff and probably would have made a huge
mess.
Last coat of paint is on now, its shiny all over and looks really nice
(check it out
from the back,
looks pretty nice with the bi-wing and lights eh?) Before the windsheild
goes in I masked and
bombed the A-pillars
a nice dark grey so the line of sight doesn't have anything distracting
(especially for night events). Also glued in the hood louvres with some
silicone, we'll see how well that adheres. I also put the windshield wiper
motor and linkage back in place, easy things that makes you feel like
you're making progress. We were going to install the windshield too, but
the glue goop doesn't have a long shelf life I guess, because it refused to
come out of the tube. Maybe for the best since we didn't have the right
applicator anyway, it's awful stuff and probably would have made a huge
mess.
Also helped a little on developing the prototype for the
GrpA replica rear beam
which is coming along nicely. It bolts to the chassis at either end and
the trailing arms slot in nicely, now the diff mounts and connectors that
go up through the body to meet with stays from the rear towers have to be
made up. Its gonna be beeeetchin!
Dug the engine out of the crate, took of the plastic wrap and discovered
its had water getting into it somehow - great. Put it up on an engine
stand and took off the pan, nice big rusty puddle at the bottom. Installed
the uprated high-volume oil pump, and cleaned things out as best I could,
at that point we knew we had to pull the head again and see if any rust has
formed in the cylinders.. so to make matters even worse, while I was
wheeling the engine stand into the shop it tipped over on the slope, cut a
huge gouge in my hand and leg and landed heavily on the concrete. Broke
the cam pulley and thought I got off lucky then I noticed the cam tower was
cracked. So now the head is garbage. Great. Well it could have been
worse I guess, it could have broken my freaking leg and I could have needed
stitches in my hand. I'd rather the engine get smashed than me... but its
just more bad luck and $$ to spend that I could do without.
Now, where the heck is my transmission that was supposed to have come
back from the rebuild last week? Got to call Hanlon first thing tomorrow
morning.
| | Feb 13, 2004
| |
Valentine's Day - no working on cars for me this weekend!
| | Feb 8, 2004
| |
Got loads done today - It's starting to REALLY look like a car now!
Of course it still doesn't have any suspension installed, but that's
coming soon.
- Adjusted rear hatch fit
- Installed hatch latch and lock
- Removed motorized regulators and windows from doors
- Installed manual crank regulators and windows
- Installed side mirrors
- Installed door handles, seals, trim, etc
- Tested heater blower motor, removed AC junk from blower box
- Installed heater blower and heater core
- Started fab/design work for replica GrpA rear beam
Windshield has arrived, that's getting installed this week as well. If its
dry enough, an extra coat of paint will go down too, the guy that did the
previous paint job didn't get enough paint and its very thin in many
places, especially the interior. If its not glossy it will be impossible
to clean once it gets dirty! I had to giggle maniacally once I could open
and close the doors and wind the windows up and down. When you close the
doors they make the most satisfying thump, very solid even though its still
just a shell in a rotisserie.
| | Feb 1, 2004
|
Finished cutting and installing the Lexan windows today. Should keep
the rain out and let the insides dry out a bit.
|
Continue reading:
2006 |
2004 |
2003 |
2002
|
|


